

Your iPhone is not only a camera or a communication gadget, but a powerful portable document scanner, which can be used in lieu of large office equipment. Be it scanning your receipts on behalf of your business, digitizing the contracts, saving handwritten notes, or creating PDFs, knowing how to scan documents on iPhone can save time and make the work process easier. Apple has designed sophisticated scanning capabilities within the iOS ecosystem, which is even simpler, quicker, and unbelievably precise even to novices.
This guide will discuss three full ways to scan documents with the Notes app, Files app, and Camera app, best third-party scanning apps, OCR, troubleshooting, and privacy. Based on the official Apple documentation and popular competitor blogs, this article puts all the pieces together in one easy-to-read, comprehensive paper.
Table of Contents
Why iPhone Is the Best Document Scanner You Already Have
Majority of the users are shocked to discover that iPhone scanners have become equal to specialized scanners. Automatic edge detection, color correction, multiple page PDF creation, and best of all, in-built OCR means that your iPhone will provide you with sharp, high quality scans wherever you take them.
The Apple ecosystem also allows having a smooth experience when you need to organize files in iCloud, email PDFs, annotate documents, or sign with digital signatures. Scanning on your iPhone can radically simplify your day, whether you are a student, a businessperson or someone who is handling significant paperwork.
How to Scan Documents on iPhone
Apple offers three native features of document scanning without any extra applications. The methods have different purposes based on the way you wish to save, edit and share your scans.
Scan Documents Using the Notes App
The easiest and most advanced scanning option on the iPhone is the Notes app. It does this automatically tagging the borders, making them easier to read and even annotating, signing and scanning more than one page in the same handy note.
Step-by-Step Guide to Scanning with Notes
The first step is to open the Notes app and tap the icon to create a new note. On the note, called the camera icon and select Scan Documents in the menu. After the scanner has been turned on place your iPhone on the top of the document. The app will automatically scan the paper and capture it, although you can always press the capture button.
Once you have caught a page the app displays a resizable frame which allows you to fine-tune the edges of the scan. Tap Keep Scan and in case you want to add more pages just repeat scanning. You can then choose Save when you are finished and your whole document, whether single or multi-page, will be stored in your note as a PDF in a neat and tidy manner.
When to Use the Notes Scanner
Notes is best when you need fast access to your scans, need to make notes on them or often handle your documents along with your handwritten notes. It is particularly effective with receipts, contracts, office documents and handwritten forms as you can always get a high-quality scan with it.
Scan Documents Using the Files App
Although Notes can be very useful when it comes to making scans that are casual or productivity-oriented, the Files app is ideal when you want your scans to be structured in the form of a formal document. All the scans are saved as a PDF in any folder of your choosing, which is why it is a strong contender in business and people who use cloud storage.
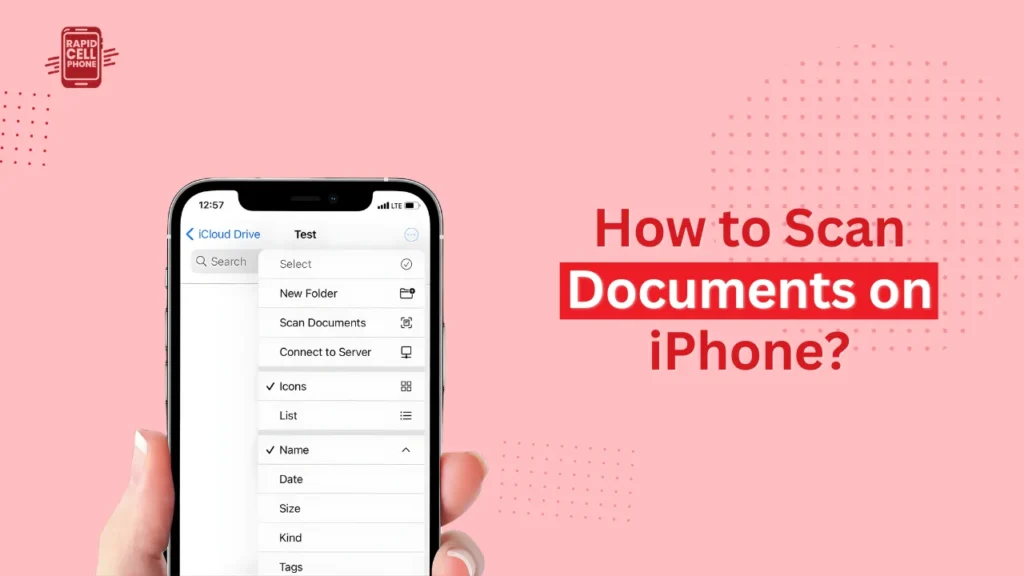
How to Scan Using the Files App
Tap the three dots (•••) at the upper right of the screen to open the Files app. Select Scan Documents in the menu. Aim your iPhone at the document that you wish to scan. The camera will identify boundaries automatically and scan them, although it can always be captured manually. After the scan has been shown, make the corners straight, turn the page upside down as needed, and tap Done.
The next step is to choose where you would like to save the PDF, and files give you the full choice of storage. Directly save to iCloud Drive or local hard disk or a connected cloud drive such as Google Drive or Dropbox.
Why Choose the Files App Scanner
The Files scanner is perfect when you want your scanned files in a well organized folder format. It works well with invoices, client form, legal documents, scanned reports, and any other document you want to email or upload.
Scan Documents Using the iPhone Camera
Even though the Camera application lacks an in-built document scanning functionality, most people use it to capture images on the fly. This is also applicable when you need to take a document, quickly and later on convert it into a PDF.
How to Convert Camera Photos into PDFs
First, take an image of the document in a clear way. Then open the picture, press on the Share button, and select Save to Files. There, choose the place where the file is to be stored. The image will automatically turn into a PDF which you can rename, annotate, or even send using the Files app.
This technique is effective when time is limited or you do not require accurate edge detection.
How to Save, Share, and Export iPhone Scans as PDF
To use the scans professionally, it is necessary to save it in PDF format, and fortunately, this can be done easily and in a short period of time by using iOS. Scanning your file in notes will store your scan in a note, however, to get it out of your note, open the scanned file and tap Share before choosing to save it to Files. This generates a PDF document in any location.
Your scan is saved automatically as a PDF in the Files app. You can long-press the file to rename, add tags, or share it immediately either via email, messaging apps, or cloud-based solutions.
How to Scan Multiple Pages into One PDF
Multi-page scanning is easily achieved on Apple built-in scanning devices. Notes or Files When scanning, it is simply necessary to scan the first page. Do not press save, keep scanning more pages. The app will save each capture at a time and eventually lash them together into a single refined PDF. It is particularly handy in scanning books, multifarious forms, files of law, or multi sheet contracts.
Best iPhone Document Scanner Apps for Advanced Features
Whereas the iPhone scanners are strong natively, there are those users that require more advanced features such as OCR (Optical Character Recognition), batch scanning or direct connection to the cloud. A number of applications have sophisticated scanning features.
Microsoft Lens
One of the best free scanner applications is Microsoft Lens. It works very well when scanning documents, whiteboards or handwritten notes. The in-built OCR will enable you to translate text into editable Word documents or directly to OneNote or PDF. This app will particularly be useful to users who use Microsoft Office.
Adobe Scan
Adobe Scan is a good option in case you want quality PDF scans and accurate text recognition. The automatic OCR in Adobe is one of the trustworthy ones so your scanned PDFs become totally searchable. It works perfectly well with Adobe Acrobat and provides automatic document improvement thus it can be used both personally and professionally.
Genius Scan & SwiftScan
Applications such as Genius Scan and SwiftScan are very good with batch scanning, sorting, and exporting. They contain filters, intelligent edge detection, and rapid processing, which makes them perfect when a professional has to work with numerous documents on a daily basis. They are the preferred choice of accountants, lawyers, and office administrators due to their cloud integrations and security options.
How to Extract Text from Scanned Documents
OCR, or Optical Character Recognition, enables your iPhone to transform scanned pages into editable or searchable text. iOS has two efficient OCR choices.
Using Live Text in Photos
Apple Live Text identifies the text in images automatically. Once you have scanned a document or a photo, you can open the image and tap on the highlighted area of text. The extracted text is automatically copied, shared, translated, or searched in real-time. It is most effective with typed and clear documents, and is a popular feature among researchers and students.
Using Third-Party OCR Apps
Adobe Scan, Microsoft Lens and others are apps that use OCR to automatically scan a document as soon as it is scanned. It comes in very handy when you need searchable PDFs or have to export your text to Word, Google Docs or email. OCR is particularly useful when scanning printed books, articles, business cards or long reports.
Tips for Getting the Clearest Scan on Your iPhone
The quality of scans has a lot to do with lighting. The natural daylight or a bright lamp to remove shadows and enhance clarity. To allow your iPhone to recognize edges better, place your document on a dark and high-contrast background. Keep your device steady, then tap before scanning and ensure that the lens is clean. The Auto-Capture option in Notes or Files is a sure way to get crisp results with a little effort.
Document Security and Privacy Tips
When you are scanning sensitive documents such as passports, ID cards, or even official documents, you should observe good security practices. Use trusted applications like Notes, Files, Adobe Scan, or Microsoft Lens. Switch off cloud uploads when dealing with sensitive files. You can also use password or Face ID to lock your Notes to keep sensitive scans confidential on Apple too. It is always important to delete files or photos which are not intended to be stored on your phone.
Troubleshooting Common iPhone Scanning Problems
Other users are facing difficulties with document scanning. When you are not seeing the edges of your piece of paper, go ahead and put it on a dark background or just change the lighting. In the case of a blurred scanned image, clean your camera lens and keep your iPhone steady. In the cases when PDF files are too bulky, compress them in a third-party application or save in lower quality. In case the scanning feature has vanished in Notes, you should update your iOS or just restart your phone and, in most cases, this would help solve the problem.
Conclusion
Knowing how to scan documents on iPhone may change your approach in handling paperwork. You can choose whether you like the simplicity of the Notes app, the organizational capabilities of the Files app, or the advanced features of Microsoft Lens and Adobe Scan, your iPhone offers you all you could want to bring out sharp, professionally polished digital documents.
Your iPhone also has built-in OCR, multi-page scanning, PDF export and secure storage features, making it the best document scanner you already have. These techniques will help you never have to use a traditional scanner ever again.
FAQs About How to Scan Documents on iPhone?
Can I scan handwritten notes on my iPhone?
Yes, Notes can read handwriting, and Live Text can read typed or printed handwriting in most situations.
Can I sign scanned documents on iPhone?
Any scan can be opened, you can tap Markup, and use the Signature tool to sign forms or contracts digitally.
Where are scanned documents saved?
Scans of files are saved directly in your chosen folder in PDF format, and Notes scans are saved within your chosen note.
Can I scan receipts for tax or business purposes?
Yes, iPhone scanners are fine with receipts. Better enhancement tools are provided by apps such as Adobe Scan or Genius Scan.
0 Comments